lol sst can deploy a $5 vps quick example deploying an nginx docker image, less than 50 lines
self-hosting with sst on a $5 vps.
I’ve been using SST to deploy some of my projects to AWS for the past year. Some of these actually had more than 0 users. This + my shit code + AWS = 💸.
Safe to say I was waking up in the middle of the night drenched in sweat worrying about my AWS bill (or not really since they gave me $1000s of credits, but still). Luckily for me, SST recently released an update that allows me to become a $5 VPS guy.
I’m going to show you how to use SST to self-host Plunk with SST on Hetzner Cloud, all with a custom domain, HTTPS, and more. Even if you’re not interested in self-hosting Plunk, I think this guide can still be useful to help you figure out how to self-host other stuff with SST.
Set up AWS
Section titled: Set up AWSWorst things first, we have to set up AWS. Thankfully SST has a guide on how to set up your AWS account and manage your environments and credentials in a simple and secure way.
Set up Hetzner
Section titled: Set up Hetzner
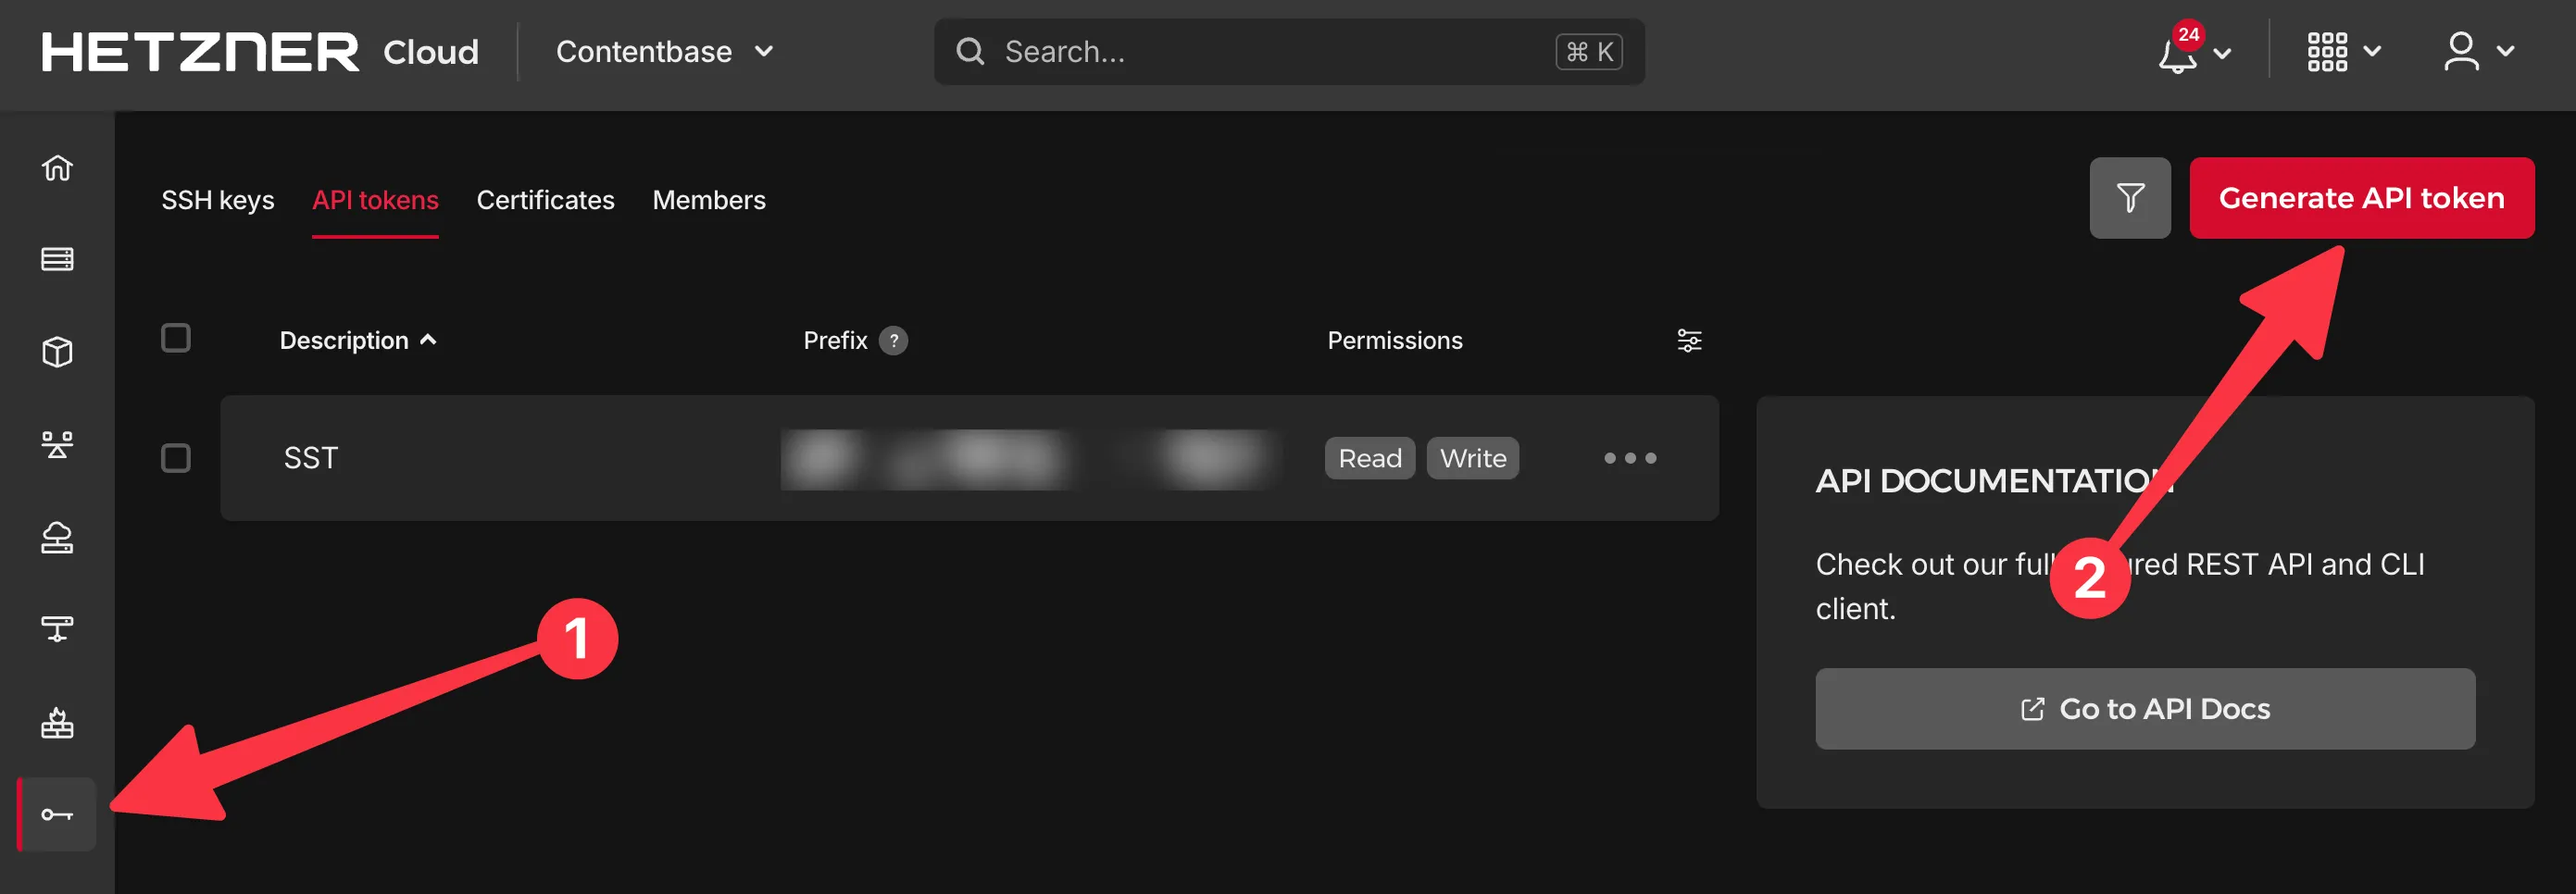
I’m using Hetzner, but if you want to use Digital Ocean, or any of the other platforms out there, go ahead. I’m sure there’s a Pulumi provider out there and SST is just a Pulumi wrapper after all. For Hetzner all you’ll need to do is sign up, create a project, head to the security section, and create an API token. Put this token in your .env file:
HCLOUD_TOKEN="your-token"Set up Cloudflare
Section titled: Set up Cloudflare
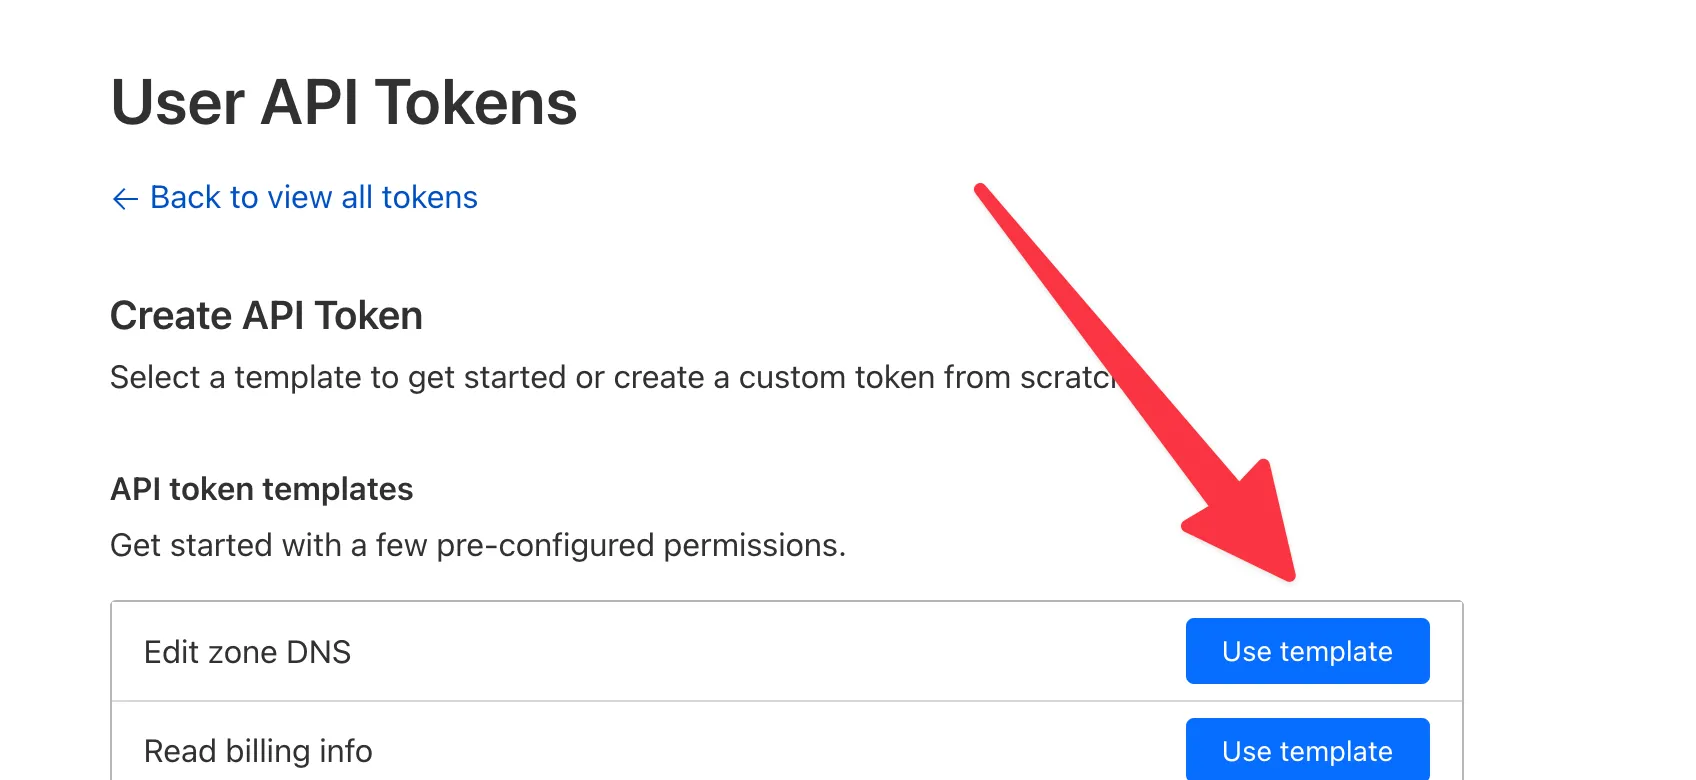
We’re going to use Cloudflare for our DNS. If you don’t have an account yet, go ahead and create one. Once you have an account, add your domain to Cloudflare and change your nameservers to the ones Cloudflare provides. Then create an API token by heading to your profile, then API tokens and clicking “Create token”. You can use the “Edit zone DNS” template. Once you’re done, copy the key and put it in your .env file:
CLOUDFLARE_API_TOKEN="your-token"
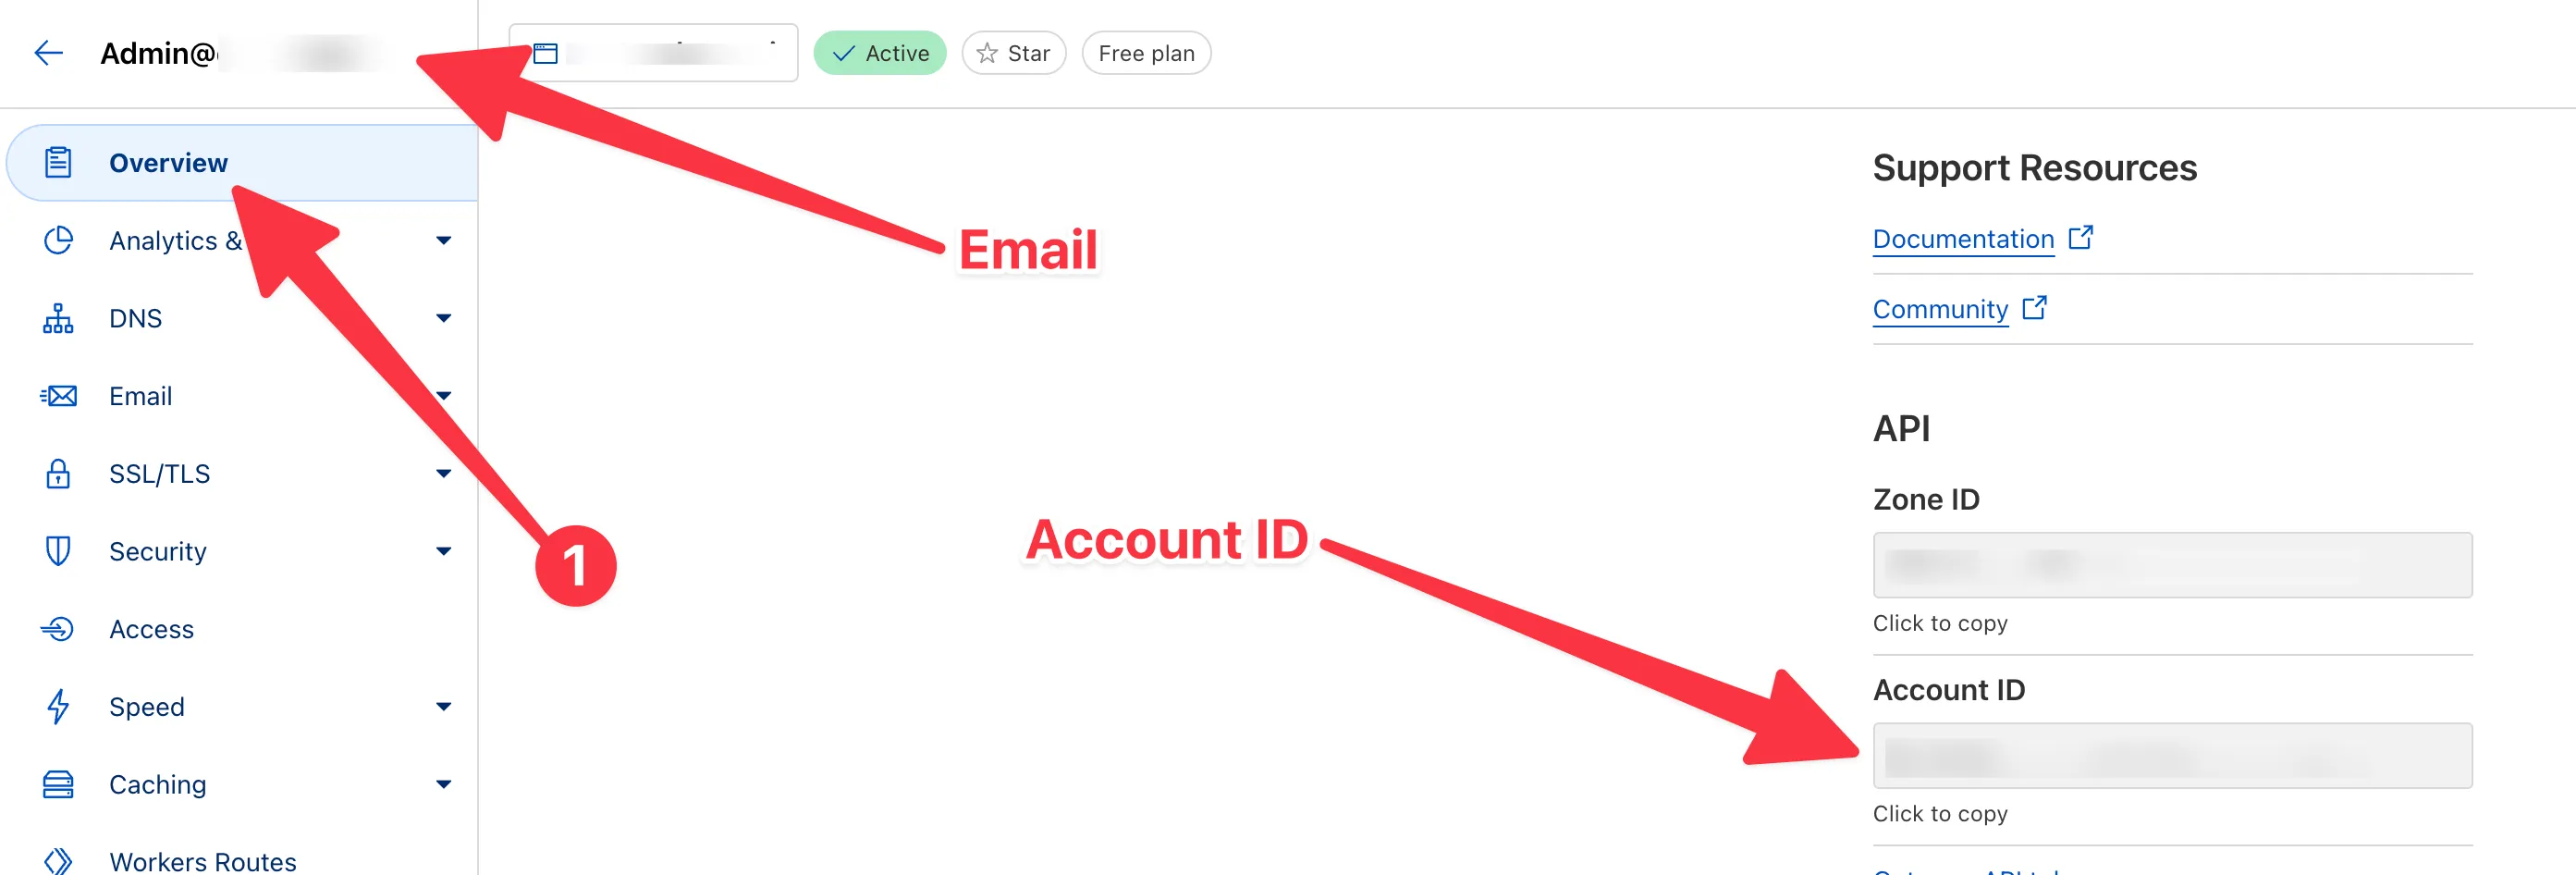
You’ll also need your Cloudflare email and account id, which you can find on your domain’s overview page on the top left and bottom right respectively. Put these in your .env file as well:
CLOUDFLARE_DEFAULT_ACCOUNT_ID="your-id"CLOUDFLARE_EMAIL="your-email"Also, head over to the SSL/TLS section and set your SSL/TLS encryption mode to “Full (strict)”.
Set up SST
Section titled: Set up SSTFinally, we can set up SST. First, either install the CLI via npm:
npm install sstor install it globally
curl -fsSL https://sst.dev/install | bashSet up the project
Section titled: Set up the projectNow everything is set up, we can finally create our project and self-host Plunk. Create your sst.config.ts file
export default $config({ app(input) { return { name: "plunk", removal: input.stage === "production" ? "retain" : "remove", home: "local", }; }, async run() { // ... },});First, let’s set up our server. Run sst add hcloud and sst add tls and add the following code to your run function:
const privateKey = new tls.PrivateKey("PrivateKey", {  algorithm: "RSA",  rsaBits: 4096,});
const publicKey = new hcloud.SshKey("PublicKey", {  publicKey: privateKey.publicKeyOpenssh,});
const server = new hcloud.Server("Server", {  image: "debian-12",  serverType: "cx11",  sshKeys: [publicKey.id],  userData: [    `#!/bin/bash`,    `apt-get update`,    `apt-get install -y docker.io`,    `systemctl enable --now docker`,    `usermod -aG docker debian`,  ].join("\n"),});
return {  url: $interpolate`http://${server.ipv4Address}`,};
This will set up your server, install & enable Docker, and add the debian user to the docker group. To be honest, you should definitely change the userData to something more secure (I’m new to this $5 VPS stuff ok, I still need to figure out how to harden servers myself), but this is just a tutorial.
Running sst deploy will now deploy your server to Hetzner Cloud and log the server’s IP address to your console. You can connect to the server by running the following command:
According to Plunk’s self-hosting guide, we need to set up a few things:
- An SNS topic
- A configuration set
- AWS credentials
- Postgres
- Redis
- Plunk itself
- A subscription to SNS
Would you be surprised if I told you that you can do all of this with SST? I hope not, because you can. Run sst add aws, sst add docker, sst add random. Update your app function to be something like
app(input) { return { // ... other stuff providers: { // ... other providers aws: { region: "eu-central-1", profile: input.stage === "production" ? "production" : "development", }, }, };}You should change production and development to the names of your AWS profiles. You can also change the region to your preferred region.
Then, add the following code to your run function:
// Set up an SNS topicconst plunkSnsTopic = new aws.sns.Topic("PlunkSNSTopic", {  name: "plunk",});
// A configuration setconst plunkConfigurationSet = new aws.ses.ConfigurationSet("PlunkConfigurationSet", {  name: "plunk-configuration-set",});

const eventDestination = new aws.ses.EventDestination("SESEventDestination", {  configurationSetName: plunkConfigurationSet.name,  enabled: true,  matchingTypes: ["send", "delivery", "bounce", "complaint", "open", "click"],  snsDestination: {    topicArn: plunkSnsTopic.arn,  },});
// AWS credentialsconst plunkUser = new aws.iam.User("PlunkUser", {  name: "plunk-user",});
const plunkUserAccessKey = new aws.iam.AccessKey("PlunkUserAccessKey", {  user: plunkUser.name,});
new aws.iam.UserPolicy("SESUserPolicy", {  user: plunkUser.name,  policy: JSON.stringify({    Version: "2012-10-17",    Statement: [      {        Sid: "VisualEditor0",        Effect: "Allow",        Action: [          "ses:SetIdentityMailFromDomain",          "ses:GetIdentityDkimAttributes",          "ses:SendRawEmail",          "ses:GetIdentityVerificationAttributes",          "ses:VerifyDomainDkim",          "ses:ListIdentities",          "ses:SetIdentityFeedbackForwardingEnabled",        ],        Resource: "*",      },    ],  }),});
// Dockerconst keyPath = privateKey.privateKeyOpenssh.apply((key) => {  const path = "key_rsa";  writeFileSync(path, key, { mode: 0o600 });  return resolve(path);});
// Wait until Docker is ready on the serverconst dockerServiceReady = new command.remote.Command(    `${name}DockerServiceReady`,    {      connection: {        host: server.ipv4Address,        user: "root",        privateKey: privateKey.privateKeyOpenssh,      },      create: $interpolate`until systemctl is-active --quiet docker; do  echo "Waiting for Docker to start..."  sleep 5done`,    },    {      dependsOn: [server],    },  );

const dockerProvider = new docker.Provider(  "DockerProvider",  {    host: $interpolate`ssh://root@${server.ipv4Address}`,    sshOpts: ["-i", keyPath, "-o", "StrictHostKeyChecking=no"],  },  {    dependsOn: [dockerServiceReady],  },);
const network = new docker.Network(  "DockerNetwork",  {    name: "network",  },  {    provider: dockerProvider,    dependsOn: [dockerProvider],  },);
// Postgresconst dbName = "your-db-name";
const dbPassword = new random.RandomPassword("DbPassword", {  length: 16,  special: false,});
const postgres = new docker.Container(  "PostgresContainer",  {    name: "db",    image: "postgres",    envs: [      $interpolate`POSTGRES_PASSWORD=${dbPassword.result}`,      $interpolate`POSTGRES_DB=${dbName}`,      "POSTGRES_USER=postgres",    ],    networksAdvanced: [{ name: network.name }],    volumes: [      {        volumeName: "postgres_data",        containerPath: "/var/lib/postgresql/data",      },    ],    healthcheck: {      tests: ["CMD-SHELL", $interpolate`pg_isready -U postgres -d ${dbName}`],      interval: "10s",      timeout: "10s",      retries: 5,    },    restart: "always",  },  {    provider: dockerProvider,    dependsOn: [network],  },);
const postgresConnectionString = $interpolate`postgresql://postgres:${dbPassword.result}@db:5432/${dbName}`;
// Redisconst redis = new docker.Container(  "RedisContainer",  {    name: "redis",    image: "redis:latest",    networksAdvanced: [{ name: network.name }],    restart: "always",  },  { provider: dockerProvider, dependsOn: [network] },);const redisConnectionString = $interpolate`redis://redis:6379`;
// Plunkconst jwtSecret = new random.RandomPassword("JwtSecret", {  length: 32,  special: true,});
const plunkDomain = $interpolate`http://${server.ipv4Address}`;
const plunk = new docker.Container(  "PlunkContainer",  {    name: "plunk",    image: "driaug/plunk",    ports: [      {        internal: 3000,        external: 3000,      },    ],    networksAdvanced: [{ name: network.name }],    envs: [      $interpolate`REDIS_URL=${redisConnectionString}`,      $interpolate`DATABASE_URL=${postgresConnectionString}`,      $interpolate`JWT_SECRET=${jwtSecret.result}`,      $interpolate`AWS_REGION=${region}`,      $interpolate`AWS_ACCESS_KEY_ID=${plunkUserAccessKey.id}`,      $interpolate`AWS_SECRET_ACCESS_KEY=${plunkUserAccessKey.secret}`,      $interpolate`AWS_SES_CONFIGURATION_SET=${plunkConfigurationSet.name}`,      $interpolate`NEXT_PUBLIC_API_URI=${plunkDomain}/api`,      $interpolate`API_URI=${plunkDomain}/api`,      $interpolate`APP_URI=${plunkDomain}`,      "DISABLE_SIGNUPS=False",    ],    entrypoints: ["/app/entry.sh"],    restart: "always",  },  {    provider: dockerProvider,    dependsOn: [postgres, redis],  },);
// A subscription to SNSconst snsSubscription = new aws.sns.TopicSubscription(  "SNSSubscription",  {    topic: plunkSnsTopic.arn,    protocol: "http",    endpoint: `${plunkDomain}/api/webhooks/incoming/sns`,    endpointAutoConfirms: false,  },  {    dependsOn: [plunk, plunkSnsTopic],  },);
This will set up everything you need to self-host Plunk. Run sst deploy and you should be able to view your self-hosted Plunk by visiting http://your.server.ip:3000.

Adding a custom domain
Section titled: Adding a custom domainObviously you don’t want to use your server’s IP address to access Plunk over HTTP. With SST we can also set up Cloudflare to point a custom domain to our server and Caddy (or any other reverse proxy) to handle HTTPS. Run sst add cloudflare and sst add command and add the following code to your run function:
// Set up Cloudflareconst domain =  {    production: "example.com",    dev: "dev.example.com",  }[$app.stage] || $app.stage + ".dev.example.com";
const zone = await cloudflare.getZone({  name: "example.com",});
new cloudflare.Record(  "plunkDnsRecord",  {    zoneId: zone.id,    name: "plunk." + domain.replace(/\.example\.com$/, ""),    type: "A",    value: server.ipv4Address,    proxied: true,  },  {    dependsOn: [server],  },);
// const plunkDomain = $interpolate`http://${server.ipv4Address}`;const plunkDomain = `https://plunk.${domain}`;
// Set up Caddyconst defaultCaddyFile = `{  email [email protected]}
# Catch-all:80, :443 {  respond "Service not found" 404}`;
const caddyDataVolume = new docker.Volume("CaddyDataVolume", {});const caddyConfigurationVolume = new docker.Volume("CaddyConfigurationVolume", {});
const caddyfileContent =  defaultCaddyFile +`https://${plunkDomain} {  reverse_proxy plunk:3000}`;
const remoteCaddyfile = new command.remote.Command(  "CaddyFile",  {    connection: {      host: server.ipv4Address,      user: "root",      privateKey: privateKey.privateKeyOpenssh,    },    create: `echo '${caddyfileContent}' > /root/Caddyfile`,  },  { dependsOn: [server] },);
const caddyContainer = new docker.Container(  "CaddyContainer",  {    name: "caddy",    image: "caddy:2.8.4",    ports: [      { internal: 80, external: 80 },      { internal: 443, external: 443 },      { internal: 2019, external: 2019 },      { internal: 8080, external: 8080 },    ],    networksAdvanced: [{ name: network.name }],    volumes: [      { containerPath: "/etc/caddy/Caddyfile", hostPath: "/root/Caddyfile" },      { containerPath: "/data", volumeName: caddyDataVolume.name },      { containerPath: "/config", volumeName: caddyConfigurationVolume.name },    ],    restart: "always",  },  { provider: dockerProvider, dependsOn: [server, remoteCaddyfile, plunk] },);
// Update this to HTTPS as well:const snsSubscription = new aws.sns.TopicSubscription(  "SNSSubscription",  {    topic: plunkSnsTopic.arn,    protocol: "https", // ⬅️ Change this to https    endpoint: `${plunkDomain}/api/webhooks/incoming/sns`,    endpointAutoConfirms: false,  },  {    dependsOn: [plunk, plunkSnsTopic],  },);
Boom! Run sst deploy and you can view your self-hosted Plunk by visiting https://plunk.example.com (obviously replace example.com with your domain).
Confirm the subscription
Section titled: Confirm the subscriptionUnfortunately, Plunk can’t automatically confirm the subscription to the SNS topic, so we need to do this manually.
SSH into your server and run docker ps. Copy the id of the Plunk container and run docker logs -f <id>.

Then, head over to the SNS console (click “Start with an overview” if it prompts you to create a topic), navigate to the subscription and click on “Request confirmation”. AWS will send a mock HTTP POST request to your Plunk endpoint and Plunk will recognise that you want to confirm the subscription and show you the URL to confirm it. Copy and paste it into your browser and you’re done!
Conclusion
Section titled: ConclusionAnd that’s it! You’ve now self-hosted Plunk with SST on a $5 VPS. You can now access Plunk by visiting https://plunk.example.com.
There are probably loads of things you can do to improve this setup, but I hope this guide has given you a good starting point.
If you have any questions, feel free to ask me on 𝕏. I’ll also definitely be writing more about my experience with $5 VPSs and SST in the future (hardening your server, zero downtime deployments, etc.), so give me a follow if you’re interested in that.
